Best EMF Meters for Home Testing (2026): Honest Reviews from Someone Who Actually Uses Them

I own two of the best EMF meters on this list and use them regularly in my own home. Once I started measuring EMF around my house, I got pretty particular about which tools and technology actually give you useful information and which ones leave you with blind spots. Everything below is based on personal testing where I have it, and honest research where I don’t.

Affiliate disclosure: Some links here are affiliate links. If you buy through them I may earn a small commission at no extra cost to you.

Quick Picks

  1. Trifield TF2 — Best all-around meter for most people. Measures all three EMF types. My daily driver.
  2. GQ EMF-390 — Best for data logging and spectrum analysis. My second meter for deeper dives.
  3. Safe and Sound Pro II — Best RF-only meter. Third-party certified accuracy. Trusted by professionals.
  4. ERICKHILL RT-100S (3-in-1) — Best budget pick that covers all three field types.
  5. ERICKHILL Basic — Magnetic and electric only. Read my note before buying this one.

1. Trifield TF2

My Personal Pick — The best all-around meter for most people

The Trifield TF2 is the meter I reach for most often. It measures all three EMF types, it’s easy to use, and the readings make sense without needing an engineering degree. I’ve used mine to walk through every room in my house, test appliances, check around my JRS Eco router, measure the field around my laptop and other products.

What I like most is the 3-axis magnetic field sensor. Most budget meters only measure in one direction, which means you have to rotate the meter around to find the peak reading. The TF2 picks up magnetic fields from all three axes simultaneously, so you get an accurate reading no matter how you’re holding it.

The RF mode covers 20 MHz all the way up to 6 GHz, which handles Wi-Fi (both 2.4 and 5 GHz bands), cell phone signals, smart meters, and Bluetooth. Use peak mode when testing anything wireless. RF from digital devices comes in pulses, and if you just watch the average reading, you’ll miss the spikes.

One honest limitation: the RF accuracy is rated at plus or minus 20 percent at 1 GHz. That sounds rough, but for home testing purposes it’s fine. You’re generally trying to understand whether a source is low, moderate, or high, not publish research-grade data.

SpecDetail
Magnetic field range0.1 to 100.0 mG (40 Hz to 100 kHz)
Electric field range1 to 1000 V/m (40 Hz to 100 kHz)
RF range0.001 to 19.999 mW/m² (20 MHz to 6 GHz)
Magnetic axis3-axis (true simultaneous)
Battery9V alkaline, 20+ hours (backlight off)
Special featuresWeighted mode, peak hold, audio indicator, backlight

What I like

  • True 3-axis magnetic sensing
  • Covers all three EMF types in one unit
  • Intuitive dial-based controls
  • Peak hold essential for pulsed RF
  • Long battery life

Worth knowing

  • RF accuracy is ±20% (fine for home use, not lab-grade)
  • No data logging
  • Higher price than budget options
  • RF is 1-axis (rotate meter when testing wireless sources)

My take: This is the meter I’d buy again without hesitation. If you only buy one meter, this is the one. It does everything well enough for real home testing, and the ease of use means you’ll actually pick it up and use it regularly.

Check price on Amazon

2. GQ EMF-390

My Personal Pick — For data loggers, spectrum watchers, and detail-oriented testers

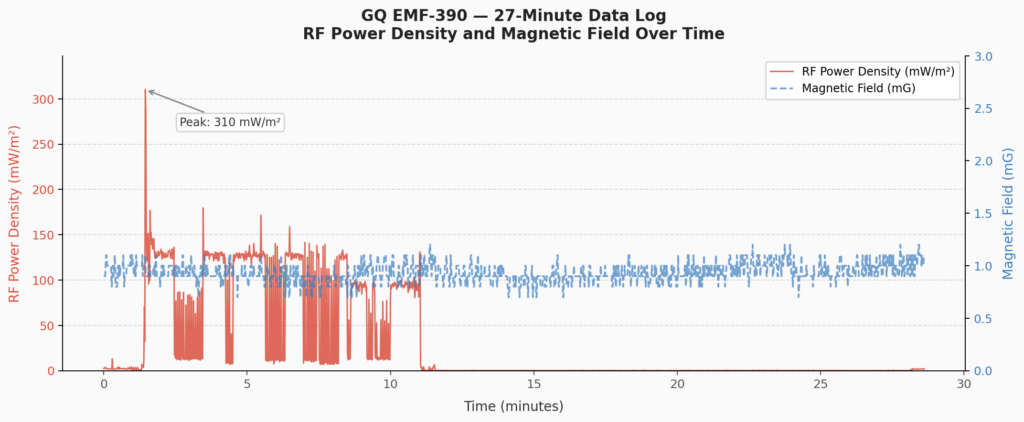
The GQ EMF-390 is the second meter I added to my collection, and it fills a different role than the TF2. Where the Trifield is simple and intuitive, the GQ is information-dense and feature-rich. It’s not the meter I grab for a quick sweep of a room, but it’s the one I use when I want to track readings over time or dig into the RF spectrum.

The built-in data logging is what makes it genuinely unique at this price point. The meter stores real-time readings every second with timestamps to 1MB of internal flash memory. You connect it to a PC via USB, download the data with the free EMF-Pro software, and look back at what your environment was doing while you were asleep or away. I used this to monitor RF levels in my bedroom overnight. It’s a completely different kind of insight than a spot reading.

The RF browser displays a visual graph of RF signals over the past 45 seconds, which helps you see whether signals are pulsed or more continuous. The built-in spectrum analyzer lets you identify what frequency a signal is coming from, which is useful when you’re trying to figure out which device is responsible for a reading.

The main trade-off is usability. The display is functional but cramped, and navigating the settings takes some getting used to. I wouldn’t hand this to someone who just wants to walk around their house and get quick readings. But if you want to actually understand your data, this meter rewards patience.

SpecDetail
Magnetic field range0 to 500 mG
Electric field range0 to 1000 V/m
RF range0.02 to 9999 mW/m² (up to 10 GHz)
Data loggingYes, 1MB internal flash, PC download via USB
Special featuresRF spectrum analyzer, RF browser, simultaneous display, rechargeable
Made inUSA (GQ Electronics, Seattle WA)

What I like

  • Built-in data logging with PC software
  • RF spectrum analyzer (unique at this price)
  • Broader RF range up to 10 GHz
  • Rechargeable via USB
  • Simultaneous display of all three field types
  • USA-based company with good support

Worth knowing

  • Steeper learning curve than the TF2
  • Display is functional but not pretty
  • Some mixed user reports on magnetic field accuracy
  • Requires time investment to get the most from it

My take: This is my second meter, not my first, and that’s exactly how I’d recommend using it. Get comfortable with the TF2, then add the GQ when you want to go deeper. If data logging or spectrum analysis sounds exciting to you, it’s worth every penny.

Check price on Amazon

3. Safe and Sound Pro II

RF Specialist: The most accurate RF meter on this list, but RF only

I want to be transparent: I haven’t personally used the Safe and Sound Pro II. Everything below is based on published specs, independent testing reports, and the consistent recommendations of building biologists and EMF consultants who use it in professional assessments. I’d weigh their experience heavily here. This community tends to be more rigorous about meter accuracy than most.

It’s third-party certified by Nemko Canada, individually calibrated, and covers 200 MHz to 8 GHz with true response detection between 400 MHz and 7.2 GHz at plus or minus 6 dB. EMF engineers and building biologists regularly recommend it as the minimum standard for professional home testing.

The audio function is more useful than it sounds on paper. A pulsed digital signal like a smart meter transmitting produces a rhythmic clicking pattern. Continuous wave signals sound different. Wi-Fi has its own recognizable signature.

Once you learn those patterns, you are not just reading numbers on a screen. You are developing an ear for your environment. Building biologists who write about this meter regularly mention the audio as something that genuinely changes how they approach a testing session.

The big limitation is obvious: it only measures radiofrequency (RF). If you want a complete picture of your home, you’d need to pair it with a magnetic field meter. That’s why I’d still recommend the TF2 first for most people. But if RF is your primary concern and you want the most reliable readings possible, the Safe and Sound Pro II is the right tool.

SpecDetail
MeasuresRF only (no magnetic or electric)
RF range200 MHz to 8 GHz
Sensitivity0.001 µW/m² (extremely sensitive)
Certification3rd-party lab certified (Nemko Canada)
DisplayOLED, peak/max/average readings
Battery2x AA alkaline, 12 to 15 hours

What I like

  • 3rd-party certified accuracy
  • Extremely high sensitivity (useful for EHS individuals)
  • Audio function helps identify RF sources
  • Clean OLED display with multiple reading modes
  • Widely trusted by professionals

Worth knowing

  • RF only: no magnetic or electric field measurement
  • Higher price than budget alternatives
  • You’ll need a second meter to cover all EMF types

Where this meter earns its price is in specific situations. If you are an EHS individual trying to identify particular RF triggers, if you are doing before and after measurements around shielding work, or if you simply need to trust the number on the screen rather than treat it as approximate, this is the meter built for that kind of work.

My take: Based on my research, this is the most credible RF meter at this price point. I haven’t tested it personally, but I’ve read enough independent reviews and professional recommendations to feel confident saying: if RF accuracy is your top priority, this is the one to buy.

Check price on Amazon

4. ERICKHILL ER02 (3-in-1)

Budget Pick — A capable 3-in-1 at a reasonable price

I haven’t tested the ERICKHILL ER02 myself, but the specs here are more impressive than you’d expect at this price point. Unlike most budget meters that skip RF or cap it at a low frequency, the ER02 measures all three field types and claims RF detection up to 10 GHz, which would cover most 5G signals you’re likely to encounter at home.

The dual interface is a nice touch. You get both a standard digital readout and a graph view on the same screen, which makes it easier to see how readings change over time as you move around a space. The color-coded backlit display shifts from green to orange to red as levels rise, so you get an immediate visual read without having to interpret numbers.

It sits in an interesting middle ground price-wise. More capable on paper than most budget meters, but still well below the Trifield TF2 in terms of build quality and verified accuracy. The RF detection up to 10 GHz is a bold claim at this price, and I haven’t been able to verify it independently with my own meters. Take the RF range spec with some caution until I can test it directly.

SpecDetail
MeasuresMagnetic, Electric, RF (all three)
RF rangeUp to 10 GHz (per manufacturer)
DisplayDual interface: digital readout and graph view
ScreenColor-coded backlight: green, orange, red
BatteryRechargeable, built-in
Warranty36 months

What I like

  • All three EMF types including RF
  • RF range claim of 10 GHz is strong for the price
  • Dual display interface is genuinely useful
  • Color-coded screen makes readings easy to interpret
  • Rechargeable, no disposable batteries

Worth knowing

  • RF range claim is manufacturer-stated, not independently verified at this price
  • Less proven accuracy than the TF2
  • Newer model with a smaller review base than the RT-100

My take: Based on the specs, this is a reasonable option if you want all three field types and the TF2 is out of your budget. The 10 GHz RF claim is promising but I’d treat the readings as directional rather than precise until I can test it myself. I’ll update this once I’ve had a chance to run it against my own meters.

Check price on Amazon

5.5. ERICKHILL RT-100 (Magnetic and Electric Only)

Heads Up — Worth reconsidering: this one skips RF entirely

The ERICKHILL RT-100 is fine for what it does, but it has a significant gap that I think most people don’t notice when they’re buying it: it does not measure RF at all. The Amazon listing even notes this in parentheses, “RF Not Included,” though it’s easy to miss.

The spec sheets confirm it: this meter reads magnetic fields in mG and electric fields in V/m, and that’s it. If you hold it near your Wi-Fi router, it will show you nothing useful about the RF signal coming from that router. Same for your phone, your smart meter, your Bluetooth speaker. Those are RF sources, and this meter is blind to them.

For what it does, the readings are consistent and easy to read. If all you want is a basic check of low-frequency fields near appliances and wiring, it gets that job done. But for most people getting into EMF awareness, understanding wireless device exposure is a big part of what they want to know, and this meter can’t help with that. The ER02 above adds RF for a modest price difference, and that’s worth it.

SpecDetail
MeasuresMagnetic and electric fields only
RF measurementNone
Magnetic range0 to 100 mG
Electric range0 to 1000 V/m
Auto power off5 minutes
BatteryRechargeable, USB

Where it works

  • Inexpensive and easy to use
  • Consistent readings for low-frequency fields
  • Rechargeable battery
  • Fine for a basic appliance check

Worth knowing

  • No RF measurement at all
  • Blind to Wi-Fi, cell phones, smart meters, Bluetooth
  • The ER02 above adds RF for a modest price difference
  • Auto power off at 5 minutes can be frustrating during longer tests

My take: I’d suggest reconsidering this one for most people. Not because it’s bad at what it does, but because skipping RF leaves too big a blind spot. If your budget only stretches this far, this gives you something. But if you can spend a little more, the ER02 covers all three field types and is the smarter buy.

Check price on Amazon

Which Meter Should You Buy?

Here’s how I’d think about it when choosing between these EMF detectors, depending on where you’re starting from.

If you want one solid all-around meter: Get the Trifield TF2. It measures all three EMF types, it’s straightforward to use, and the 3-axis magnetic sensor alone makes it worth the price over budget alternatives. This is what I use for most of my home testing.

If you’re on a tight budget but still want RF coverage: The ERICKHILL ER02 is the best option in that range. The manufacturer claims RF detection up to 10 GHz, which is strong for the price. I haven’t verified that independently yet, but as a starting point it covers more ground than most budget meters.

If RF accuracy is your top priority: The Safe and Sound Pro II is the most credibly accurate RF meters on this list. Pair it with the TF2 or another magnetic field meter to cover your bases.

If you want to log data over time and dig into spectrum analysis: The GQ EMF-390 is genuinely unique at its price point. I use it alongside my TF2, not instead of it.

If you’re looking at the basic ERICKHILL RT-100 with no RF: I’d encourage you to step up to the ER02 or the TF2. Skipping RF leaves too big a gap for most people’s needs.

What to Look for in the Best EMF Detector

If you’re new to this, it helps to understand that EMF isn’t one thing. It covers three distinct types of fields that require different sensors to detect.

Magnetic fields (ELF/LF) come from electricity flowing through wires and appliances. Measured in milligauss (mG). Your fridge, your electrical panel, power lines, and the wiring inside your walls all produce these.

Electric fields (EF) exist anywhere there’s voltage, even in an unplugged lamp cord that’s still connected to the wall. Measured in volts per meter (V/m). These are easy to reduce simply by unplugging things you’re not using.

Radio frequency (RF) is the high-frequency stuff: Wi-Fi, cell phone signals, smart meters, Bluetooth and anything else transmitted via antenna. Measured in microwatts per square meter (µW/m²). A dedicated radio frequency meter is the most reliable way to measure this field type accurately.

A meter that skips RF leaves a major blind spot. Several popular budget meters quietly omit it, and I’ve flagged each one clearly in the reviews above.

Frequently Asked Questions

Here are answers to the questions I hear most often from people who are just getting started with EMF testing and home safety.

Can a smartphone app replace a dedicated EMF meter?

No, not reliably. Most phones have a magnetometer for the compass function, and some apps tap into it to display magnetic field readings. But the sensor isn’t designed or calibrated for EMF measurement, the readings are inconsistent, and phones have no hardware to detect electric fields or RF radiation at all. I wrote a full breakdown of what phone apps can and can’t actually measure if you want the details.

Do EMF meters pick up Wi-Fi signals?

Most do. A combo meter like the Trifield TF2 detects RF from routers operating at 2.4 GHz and 5 GHz, which covers the majority of home networks. Where meters differ is in how sensitive they are and how accurately they read across the full frequency range. If Wi-Fi is your primary concern, RF sensitivity and frequency range are the specs to look at closely before buying.

Where should I start when testing EMF levels in my home?

Start with the places where you spend the most time, particularly your bedroom. Test at body height, move slowly, and pause near the bed and any wall that might have wiring or a router on the other side. Taking readings before and after a change, like moving a router or unplugging a device, is how you confirm whether it made a measurable difference. For a full room by room walkthrough with real readings, how to test EMF levels in your home covers every source worth checking and what to do with what you find.

What’s a normal reading on an EMF meter?

EMF meters measure electromagnetic fields across three categories, and normal readings vary depending on which type you’re testing.

Here are the precautionary guidelines most building biologists use as a reference:

  • Magnetic fields: below 1 mG in sleeping areas
  • Electric fields: below 10 V/m in sleeping areas
  • RF: below 10 µW/m² for sensitive individuals, below 100 µW/m² as a general precaution

These aren’t regulatory limits. They’re conservative benchmarks based on the precautionary principle. I’ve written a full breakdown of what normal EMF meter readings actually look like across all three field types if you want to go deeper. Regulatory limits from bodies like ICNIRP are orders of magnitude higher, and where you land on that spectrum is a personal decision.

Can a cheap EMF meter give accurate readings?

For a rough sense of high vs. low, yes. For anything more precise, like confirming whether shielding is working or comparing before and after a change, you want a calibrated meter. Budget meters often have poor frequency response, meaning they’ll under-read or miss signals in certain bands entirely. The ERICKHILL ER02’s limited 5 GHz detection is a good example of this. For a full breakdown of where budget meters fall short, read cheap electromagnetic field meter accuracy.

Do I need more than one EMF meter?

Most people don’t, especially starting out. A good all-in-one meter like the TF2 covers the full range of field types you’ll encounter at home. Where a second meter makes sense is if you want higher RF accuracy alongside your whole-home meter. That’s why I eventually added the GQ EMF-390, not to replace the TF2, but to go deeper when I wanted more detailed RF data. Most people only need one of the best EMF readers to get started.

Will an EMF meter detect 5G?

Probably, for most real-world 5G. Most current US deployments use sub-6 GHz frequencies, which all three serious meters on this list cover. The exception is millimeter wave 5G at 24 GHz and above, which requires specialized equipment and is only deployed in very specific dense urban areas. Most people will never encounter it at measurable levels indoors.

How do I know if my meter is accurate?

Run a few sanity checks. Hold it near a running hair dryer or microwave and confirm you get a magnetic field reading. Switch to RF mode near your Wi-Fi router and confirm a signal registers. If either of those fails, something is wrong. Beyond that, most consumer meters are not independently calibrated. The Safe and Sound Pro II is the only one on this list that is, which is a meaningful differentiator if accuracy matters to you.

What frequency range should an EMF meter cover?

For home use, you want coverage from around 50 MHz up to at least 6 GHz. That range captures Wi-Fi at 2.4 and 5 GHz, Bluetooth, cell signals, and smart meter transmissions. Meters that top out at 3.5 GHz will miss 5 GHz Wi-Fi entirely, which is increasingly common in modern homes. Always check the stated frequency range in the specs before buying, not just the field types the meter claims to cover.

What’s the difference between an EMF meter and a Gaussmeter?

A Gaussmeter measures magnetic fields only, typically in milligauss or tesla. An EMF meter is a broader term that usually refers to a multi-field device covering magnetic, electric, and RF. If someone recommends a Gaussmeter for home EMF testing, they’re only giving you one third of the picture. For whole-home awareness you want a meter that covers all three field types.

What is a broadband EMF meter?

A broadband EMF meter detects signals across a wide range of frequencies simultaneously, giving you a combined reading rather than isolating specific frequencies. Most consumer meters including the Trifield TF2 work this way. It’s useful for quickly identifying EMF sources, though it won’t tell you exactly which frequency is responsible for a reading. For that level of detail you’d need a spectrum analyzer like the one built into the GQ EMF-390.

Next step: Once you have a meter, check out my room-by-room home EMF testing guide to learn where to measure, what readings to expect, and which sources are typically highest in a normal home.

Disclaimer: I am not a doctor, engineer, or certified building biologist. Nothing on this site is medical advice. EMF research is ongoing and the science continues to evolve. The meters on this list are consumer tools suitable for home testing and general awareness. For professional assessment of your home or workplace, consider working with a certified building biologist. Affiliate links noted above. I earn a small commission on purchases at no cost to you.

Leave a Comment

How to Choose the Best EMF Meter

Choosing an EMF meter is more confusing than it needs to be.

There are dozens of models out there, ranging from $30 to $500+, all claiming to give you accurate readings. Some measure everything. Others only work for specific types of EMF. And the marketing language on most of them tells you very little about whether the thing will actually be useful in your home.

When I first started testing, I didn’t fully understand what I needed. I bought my first meter based on price and Amazon reviews, and it got me started, but it took a while before I understood which specs actually matter and which ones are just noise.

This guide is what I wish I’d had before I bought anything. I’ll walk you through the key decisions, explain what the specs mean in plain language, and help you figure out what kind of meter actually fits your situation. For specific product recommendations based on these criteria, EMF Protection Pros covers the recommended EMF meter to buy depending on what you’re measuring and your budget.

If you’d like to see how specific meters performed in real home testing, here’s our best EMF meters roundup.

Start Here: What Do You Actually Want to Measure?

This is the question most people skip, and it’s the most important one.

EMF is not one thing. It’s a broad term that covers several different types of fields, and different meters measure different things. If you buy the wrong type for what you’re trying to test, you’ll get either useless readings or nothing at all.

Here’s a quick breakdown of what’s out there.

Magnetic and electric fields come from the electrical wiring in your walls, appliances, power lines, and anything plugged into an outlet. These are sometimes called ELF fields, for extremely low frequency. If you want to test your electrical panel, your bedroom wiring, your refrigerator, or a lamp cord, this is what you need to measure.

Radio frequency (RF) comes from wireless devices. Your Wi-Fi router, your cell phone, Bluetooth speakers, smart meters, and cell towers all emit RF. This is a completely different type of field, and many basic meters don’t measure it at all.

Combo meters try to do both. They cover magnetic fields, electric fields, and RF in one device. The Trifield TF2, which is the meter I use most often, is a combo meter. So is the GQ EMF-390, which I use when I want to track readings over time or look at specific frequency ranges in more detail.

Figure out which category fits your concern and that alone will narrow the field significantly.

The Features That Actually Make a Difference

Once you know what type of meter you need, here’s what to pay attention to when comparing models.

Single-Axis vs. Tri-Axis

This one matters more than most people realize.

A single-axis meter has one sensor. It only picks up fields coming from one direction at a time, which means you have to slowly rotate the device to find the orientation that gives you the highest reading. It works, but it’s slow and easy to miss things.

A tri-axis meter has three sensors arranged at right angles to each other. It measures in all three directions at once and gives you the combined total automatically. No rotating required.

The price difference is usually somewhere in the $50 to $100 range. For anything beyond a one-time test, tri-axis is worth it. I use tri-axis meters for everything.

Frequency Range for RF Meters

If you’re shopping for an RF meter, the frequency range listed in the specs is one of the most important things to check.

Different wireless technologies operate at different frequencies. Standard Wi-Fi runs at 2.4 GHz and 5 GHz. Bluetooth is in a similar range. Many 5G signals push well above that, sometimes above 10 GHz depending on the band.

If your meter’s range tops out at 3 GHz, it won’t pick up anything above that. For most home testing, a range up to 8 GHz covers the majority of what you’ll encounter. If you’re specifically concerned about higher-frequency 5G bands, you’ll need something that goes further.

Always check the spec sheet, not just the marketing copy.

Display and Usability

You’re going to be walking around your home, checking readings in corners, closets, and places without great lighting. A meter with a small, dim, hard-to-read display gets frustrating quickly.

Look for a backlit digital display with numbers large enough to read at arm’s length. Some meters also include a bar graph or a color-coded LED strip (green, yellow, red) that gives you a fast visual read without having to focus on exact numbers. I find that genuinely useful when I’m scanning a room quickly.

Audio feedback is another thing I didn’t think I’d care about until I used it. A meter that beeps faster as readings increase lets you walk slowly through a room while looking at the space rather than the screen. It’s a small thing that makes testing a lot more practical.

Accuracy

Consumer meters typically have an accuracy margin of around 3 to 10 percent. For home use, that’s fine. You’re looking for relative differences between locations and sources, not laboratory-grade precision.

The meters that get down into the 1 to 2 percent range are professional instruments that cost $500 or more. Unless you’re doing this professionally or have a very specific technical need, that level of precision isn’t necessary.

Consistent, repeatable readings matter more than chasing perfect accuracy.

Build Quality and Battery Life

A meter that feels flimsy usually is. Read reviews that mention long-term durability, not just first impressions. Check whether a protective case is included or available.

Battery life varies a lot across models. Some meters run for 40 or 50 hours on a single set of batteries. Others die after 10. If you’re doing a thorough room-by-room test of your home, a short battery life becomes genuinely inconvenient. Check the spec before you buy.

Understanding the Different Types of Meters

Here’s a more detailed breakdown of the main categories.

ELF Meters

These measure low-frequency magnetic and electric fields from household wiring and appliances. Readings are displayed in milligauss (mG) or microtesla (µT), which are just two different units for the same thing. In the US, mG is the more common unit.

ELF meters are what you’d use to test your electrical panel, check the fields around your refrigerator, measure an electric blanket, or investigate wiring in a bedroom wall. They’re usually the most affordable type, with solid options available in the $50 to $100 range.

One thing to know: ELF meters do not measure RF from Wi-Fi or cell phones. If that’s what you’re after, you need an RF meter or a combo.

RF Meters

These detect wireless signals from routers, phones, smart meters, cell towers, and other wireless sources. The key spec to check is frequency range, as I mentioned above.

A good RF-only meter like the Safe and Sound Pro II tends to have better sensitivity for wireless signals than a combo meter at the same price point. If RF is your primary concern and you already have something for ELF, a dedicated RF meter is worth considering. That’s actually how I use mine. The Trifield handles day-to-day testing and I reach for the GQ EMF-390 when I want more detailed RF data.

Safe and Sound Pro II(1)

Combo Meters

Combo meters cover magnetic fields, electric fields, and RF in one device. They’re convenient and usually the right starting point for someone who wants to understand their home environment across all three types.

The tradeoff is that a combo meter at a given price point will generally be a bit less sensitive than a dedicated meter at the same price. For most home testing purposes, that difference is not significant. But if you’re specifically trying to detect weak RF from a distant cell tower, a dedicated RF meter will outperform a combo at the same price.

For beginners, I’d start with a quality combo meter. You can always add a specialized meter later if you identify a specific need.

Professional Meters

Building biologists and EMF consultants use meters that run $300 to $2,000 or more. They offer higher accuracy, wider frequency ranges, better sensitivity, and features like calibration options and detailed data logging.

For home testing, you don’t need this level of equipment. The meters in the $100 to $200 range will give you everything you need to understand your space and make informed decisions.

What You Probably Don’t Need

A few features show up in marketing copy that sound useful but rarely are in practice.

Data logging sounds helpful. In reality, most people test a spot once, note the reading, and move on. I use the data logging on my GQ EMF-390 for specific long-term observations, but it’s not something I use on every test session.

gq 390 emf meter data logging

Multiple unit display modes let you switch between mG, µT, V/m, and so on. Useful to understand once. In practice, you’ll pick one unit and stick with it.

PC connectivity and graphing software exist on some meters. Again, useful for specific research purposes, but most home users will never set it up.

Don’t pay a premium for features that won’t fit into how you actually use the meter.

Price Ranges and What to Expect

Under $50: Basic single-axis meters with limited features. These can give you a rough sense of what’s happening but expect compromises in sensitivity, accuracy, and usability. Fine for casual curiosity, but not what I’d recommend if you’re planning to do a real home assessment.

$80 to $150: Where most people should start. You can find reliable tri-axis combo meters with good accuracy and usable displays in this range. The Trifield TF2 sits here and it’s what I point beginners toward.

$150 to $250: Quality combo meters and strong dedicated RF meters. Better sensitivity, wider frequency ranges, more durable builds. Worth spending here if you have a specific concern or want more detailed RF data.

$300 and above: Professional territory. Only worth it if you’re doing this work professionally or have a very specific technical requirement.

What to Watch for When Reading Reviews

Not all reviews give you useful information. Here’s what I pay attention to.

Look for reviews from people who used the meter over several weeks or months, not just out of the box. Long-term performance is what matters.

Look for use cases similar to yours. If you’re trying to measure Wi-Fi at 5 GHz, prioritize feedback from people who actually tested that.

Pay attention to patterns in the complaints. One person mentioning a dim display might just be their preference. Ten people saying the same thing is a design issue.

Be skeptical of generic five-star reviews that don’t say anything specific. They don’t tell you how the meter actually performs.

Common Mistakes Worth Avoiding

Buying on price alone tends to lead to a second purchase. A cheap meter that doesn’t measure what you need isn’t a bargain.

Skipping the frequency range specs on RF meters is probably the most common mistake I see. If the range doesn’t cover what you’re trying to test, it doesn’t matter what else the meter does.

Buying more features than you’ll actually use is also common. More buttons and modes don’t make a meter more accurate. Simple and reliable is usually the better call.

Not accounting for distance when interpreting readings is worth mentioning here too. A reading of 50 mG right next to your microwave during a 90-second heating cycle is very different from a reading of 5 mG in the spot where you sleep every night. Context matters as much as the number.

How to Make the Decision

Start by figuring out what you actually want to measure. That one decision narrows the field more than anything else.

Set a realistic budget. For most people, $100 to $200 gets you a meter that will do everything you need for home testing without unnecessary complexity.

Prioritize tri-axis detection, an appropriate frequency range for your sources, a readable backlit display, and solid construction. Those are the things that will matter every time you use it.

Read detailed reviews from people who used the meter for actual testing, not just unboxing.

Once you know what you’re looking for, the choice becomes a lot clearer. You don’t need to test everything or spend a lot to get useful information about your home. You just need the right tool for what you’re actually trying to understand.

I’m not a doctor or an engineer, and nothing on this site is medical advice. EMF research is still evolving, and I aim to share what the current evidence suggests rather than draw conclusions the science hasn’t reached yet.

Leave a Comment

Best Low EMF WiFi Router: My Honest Breakdown

I’ll be upfront about something before we get into this. There’s really only one company doing full automatic low EMF WiFi routers the way I think it should be done. So this isn’t a typical “top 5” list padded out to look competitive. It’s an honest look at your actual options, from the most complete solution to the free one you can try tonight.

Quick List

  1. JRS Eco 100 Era
  2. JRS Eco 100 D1/D2 Firmware
  3. Manual Beacon Interval Adjustment (DIY, free)

1. JRS Eco 100 Era

My Personal Pick, the complete solution

The JRS Eco 100 Era is the router I run in my own house, and it’s the only product on this list that handles everything automatically. It’s built on the Asus TUF Gaming AX4200 with custom firmware that adds a mode called Full Eco. When nothing is using WiFi, it stops broadcasting entirely. The moment a device asks for WiFi again, it wakes back up on its own.

I measured this myself with a Trifield TF2 and GQ EMF-390, and the difference from my old router was real, especially overnight when nobody needed an active connection.

What I like

  • Full Eco mode drops to zero output automatically, no manual steps required
  • Still performs like a full modern router, AX4200 speeds, no compromise
  • WiFi scheduler lets you force an off window even if a smart device would otherwise keep it awake
  • Backed by a 2 year warranty and 30 day return policy

Worth knowing

  • It costs more than most consumer routers
  • It’s a genuinely large router, make sure you have the shelf space
  • Smart home devices that stay connected around the clock can keep it from ever fully idling on its own

My take: if you want this handled automatically and don’t want to think about it again after setup, this is the one to get. I’ve written up my full testing and readings in a complete review of the JRS Eco 100 Era if you want the details before buying.

Check price on the JRS Eco website

2. JRS Eco 100 D1/D2 Firmware

Budget Pick, for a specific set of older Asus routers

If you already own, or can find used, one of three specific Asus models, the RT-AC68U, RT-AC1900U, or RT-AC66U B1, you can buy just the firmware instead of a full new router. It installs in about 10 minutes and adds the same core Full Eco functionality, a 90 percent reduced beacon pulse rate, and a wireless scheduler.

I want to be transparent that I haven’t personally installed this firmware myself. Everything here is based on JRS’s own documentation and the install reports from other owners.

One important limitation to know before buying: this firmware only works on those three specific router models. It is not compatible with the TUF Gaming AX4200 that the Eco 100 Era is built on, so you can’t use this to save money on that router if you already own one.

What I like

  • Meaningfully cheaper than buying the full Era if you already have a compatible router
  • Same core Full Eco functionality on paper as the newer model
  • Good option if you can source a compatible Asus router secondhand

Worth knowing

  • Only works on three specific older Asus models, check compatibility before buying
  • Older hardware means older WiFi standards, no AX4200 speeds
  • I haven’t tested this installation process myself

My take: based on JRS’s documentation and real owner reports, this is a legitimate way to get most of the benefit for less money, but only if you already have or can source one of the specific compatible routers. If you’re buying new hardware anyway, the Era is the simpler path.

Check price on the JRS Eco website

3. Manual Beacon Interval Adjustment

Free, but with real limitations

Some routers let you manually adjust the beacon interval in their wireless settings, which reduces how often the router broadcasts its presence. This is the free, do it yourself version of what JRS is doing, and it’s worth knowing about since it comes up often on tech forums as a cheaper alternative.

I’ll be straightforward about where this falls short. Most consumer routers don’t expose this setting at all. On the ones that do, changing the beacon interval only reduces pulse frequency. It doesn’t give you the automatic full standby behavior, where the router goes completely silent and wakes itself back up the moment a device needs WiFi. You’d have to manually turn WiFi off and on yourself to get anywhere close to that.

What I like

  • Free if your router already exposes this setting
  • A reasonable first step if you’re not ready to buy new hardware

Worth knowing

  • Most routers don’t expose this setting in their interface at all
  • No automatic standby mode, you’re relying on yourself to turn WiFi off
  • Requires comfort digging into your router’s advanced settings

My take: worth trying if your current router supports it and you want a zero cost starting point. Just go in knowing it’s a partial solution, not a replacement for automatic Full Eco mode.

Frequently Asked Questions

Here are the questions people ask me most about reducing EMF from a router.

Is there such a thing as a completely EMF free router?

Not in active use. Any router transmitting WiFi is emitting RF by definition. What you can get close to is zero emission during standby, which is what Full Eco mode on the JRS Eco 100 Era does when no devices are connected.

Can I just turn off my WiFi at night instead of buying anything?

Yes, and it’s a completely free option. A basic outlet timer or your router’s built in schedule feature, if it has one, can turn WiFi off during hours you’re not using it, like overnight. The tradeoff is it only covers the hours you schedule. It won’t respond automatically during the day the way Full Eco mode does.

Does reducing router EMF actually make a measurable difference?

In my own testing, yes. I measured a real drop in RF output with my meters. The clearest example was overnight, since that’s usually the longest stretch where nothing in the house is asking for WiFi, but the same zero output happens anytime no device is actively connected, day or night.

Whether that difference matters to your health is still an open question. The International Agency for Research on Cancer classifies radiofrequency electromagnetic fields, the category WiFi falls under, as possibly carcinogenic to humans (Group 2B), the same category as pickled vegetables. That classification reflects limited evidence and real scientific uncertainty, not an established danger.

Which One Should You Actually Get

If you want this handled automatically and don’t want to think about it again after setup, the JRS Eco 100 Era is the one I’d point you toward. It’s the option on this list I’ve personally tested and use every day. If you already own a compatible older Asus router, the firmware alone is a legitimate way to get most of the benefit for less money. Check the price on the JRS Eco 100 Era.

This article contains affiliate links. If you purchase through these links I may earn a commission at no additional cost to you. I only recommend products I have personally used and would recommend regardless of any commission.

I’m not a doctor or an engineer. Nothing in this article is medical advice. If you have specific health concerns related to EMF exposure, talk to a qualified healthcare provider.

Leave a Comment

JRS Eco 100 Era Review: What I Found After Living With It

If you’re looking for a low EMF WiFi router that still performs like a real router, the JRS Eco 100 Era is the one I’ve been running in my own house. Most routers broadcast a beacon signal about ten times a second, whether anyone is using the internet or not. This one is built to stop doing that when no device needs it. Here’s what it actually does, what I measured, and where it falls short.

What the JRS Eco 100 Era Actually Is

The Eco 100 Era is a WiFi router based on the Asus TUF Gaming AX4200, but running custom firmware from JRS Eco instead of stock Asus software. They didn’t reinvent the router. They took a solid, well reviewed Asus router and rewrote the part that controls how it broadcasts WiFi.

The core feature is a mode JRS calls Full Eco. When no devices are actively using WiFi, the router stops broadcasting entirely. The moment a connected device asks for WiFi again, it wakes back up, usually within a second or two. JRS also claims an 87 percent reduction in beacon pulse rate compared to a standard router, even outside of Full Eco mode.

Everything else is modern router spec sheet: AX4200 speeds, a 2.5 Gbps internet port, four gigabit LAN ports, and WPA3 security. It also supports WireGuard and OpenVPN if you want to run a VPN, and has a USB 3 port for file sharing or a shared printer.

The base router supports Asus AiMesh, so larger homes can extend coverage with a second compatible unit. I haven’t tested how the low EMF features hold up across a multi-router mesh setup, so if that’s your situation, confirm with JRS directly before buying more than one.

It runs a little over $300 on the the JRS Eco website, backed by a 2 year warranty and a 30 day return policy. You’re paying for the firmware, not the hardware itself.

Setting It Up in My House

Installation took about half an hour, most of which was spent turning off the WiFi on my internet provider’s modem. This part is easy to overlook. The Eco 100 Era is a router, not a modem, so it plugs into your existing modem with an ethernet cable. If your provider’s modem has its own WiFi built in, you need to disable that separately, or you end up with two WiFi signals running at once, which defeats the purpose.

Once that was sorted, connecting my phone, laptop, and other devices was simple. The one quirk worth knowing about is the hidden “jrs” network. Your devices need to connect to it briefly during setup so the router recognizes them as devices allowed to wake it from standby. It’s a small extra step, but not one you’d expect if you’re used to a normal router.

What I Measured

I ran my Trifield TF2 and GQ EMF-390 through the house before and after switching. With the router sitting in Full Eco standby, meaning no devices were actively pulling data, I measured zero RF output at the router itself. With WiFi active on a device, readings climbed but stayed noticeably lower than what I recorded from my old router at the same distance.

The bigger difference showed up overnight. My old router pulsed a beacon signal all day and all night, whether anyone needed it or not. With the Eco 100 Era in Full Eco mode overnight, readings from the router dropped to zero for the hours nobody was using a device. That’s the window I cared about most, since that’s when we’re in the room the longest and least likely to need active WiFi.

This is one home, one set of meters. Your results may vary, but this gives you a real data point instead of just marketing copy.

What I Like

  • Full Eco mode genuinely drops to zero output when nothing needs WiFi, confirmed with two different meters
  • Wakes up fast enough that I never notice a delay
  • Performs like a full featured modern router, not a stripped down version
  • The Tx power slider lets you dial in only the range you need instead of blasting a full home’s worth of signal into a small apartment
  • WPA3 security and VPN support mean you’re not giving up anything on the security side
  • A 2 year warranty and 30 day return policy take some of the risk out of the price

Worth Knowing

  • You have to disable WiFi on your existing modem yourself, and depending on your provider, that step can be more annoying than it sounds
  • Every device needs to connect to the hidden “jrs” network once during setup
  • It’s a genuinely large router, more so than most consumer routers, so make sure you have the shelf space
  • At over $300 it costs more than most consumer routers
  • Some users report occasional reboots being necessary, though I haven’t run into that yet myself
  • If you have smart home devices that stay connected around the clock, like smart speakers or a video doorbell, Full Eco mode may rarely trigger on its own since something is always asking for WiFi. You still get the reduced pulse rate benefit any time WiFi is active, and you can force a guaranteed off window using the built in scheduler regardless of what’s connected

My take: if cutting the constant RF output in your home matters to you and you don’t want to sacrifice router performance to get there, the JRS Eco 100 Era is worth it. There isn’t really another product on the market doing exactly what Full Eco mode does, so this is less about comparing it to a cheaper alternative and more about deciding if the feature itself is worth it to you. It’s the one running my network right now, and my own readings back up what JRS claims it does.

Check price on the JRS Eco website

Frequently Asked Questions

Here are the questions I get asked most often about this specific router.

Will this still help if I have smart home devices that are always connected?

Yes, but with a caveat. Full Eco mode relies on nothing asking for WiFi, so a smart speaker, video doorbell, or similar always-on device can keep the router from ever fully idling. You still get the 87 percent reduced pulse rate any time WiFi is active, and you can use the router’s built in scheduler to force a guaranteed off window, like overnight, no matter what’s connected.

Could I just do this myself by changing settings on my own router?

You’ll find real skepticism about this on tech-focused forums, where some argue you’re paying for something you could set up yourself by adjusting a router’s beacon interval. There’s some truth to that if your router happens to expose that setting, which most consumer routers don’t. But even on routers that do, it only reduces beacon frequency. It doesn’t replicate the on-demand full standby behavior, where the router goes completely silent and wakes back up automatically the moment a device asks for WiFi. That combination is what you’re paying JRS’s firmware for.

Does using this router slow down my internet?

Not in my experience. It’s still running full AX4200 speeds, and I haven’t noticed any drop in speed or range compared to my old router.

Why I Wanted a Lower EMF Router in the First Place

A router doesn’t just turn on when you need it. It runs continuously, all day and all night, in the same spot in your home, whether anyone is using it or not. That’s the part that made me want more control over mine.

The ICNIRP exposure guidelines that most routers are built around were set to prevent short term heating effects, and they haven’t been substantially updated to reflect the growing research on long term, low level exposure, including findings from the National Toxicology Program study and the Ramazzini Institute.

Hundreds of researchers have signed the International EMF Scientist Appeal calling for stronger standards. Regulators have been slow to act on environmental health risks before, asbestos and lead being the obvious examples. That history doesn’t prove WiFi is next in line. It just means reducing exposure where it’s easy to do isn’t overreacting. It’s a reasonable precaution while the research catches up.

Where to Get This Low EMF Router

Everything in this review comes from my own testing, not manufacturer claims. If reducing the constant RF output in your home is worth it to you, this is the router doing it, and it’s the one I’m still using. Check the price on the JRS Eco website.

This article contains affiliate links. If you purchase through these links I may earn a commission at no additional cost to you. I only recommend products I have personally used and would recommend regardless of any commission.

I’m not a doctor or an engineer. Nothing in this review is medical advice. If you have specific health concerns related to EMF exposure, talk to a qualified healthcare provider.

Leave a Comment