If you just unboxed your Trifield TF2 and are staring at the dial wondering where to start, this guide is for you. I’ll walk you through every mode, explain what the display is actually telling you, and show you how to take readings that are useful and comparable to the benchmarks that matter.
This isn’t a spec sheet walkthrough. It’s how I actually use this meter in my own home, with real numbers from real spots so you have a reference point for what you find in yours. If you’re still deciding whether the TF2 is the right meter for you, the full Trifield review covers what it does well, where it falls short, and how it compares to other options. If you haven’t narrowed it down to the TF2 yet, see the top EMF meters for home testing first.

Distance Is Your Most Effective Tool
Before you turn the meter on, there’s one principle worth understanding because it will make every reading you take more useful.
Distance matters more than almost any other variable in home EMF testing. Fields drop off rapidly as you move away from a source, often dramatically within just a foot or two. The stove reading I’ll show you later goes from over 80 mG right at the surface to 0.0 mG a couple of feet back. The outlet above my headboard reads 508 V/m practically touching it and 6 V/m at two feet. That’s not a gradual decline. It’s a cliff.
This means two things. First, brief exposures near high-field sources like appliances are rarely the concern. Second, what matters most is what’s elevated in the places where you spend hours at a time, which is almost always the bedroom or home office. Keeping that in mind as you test will help you prioritize what’s actually worth acting on.
What’s on the Dial
The TF2 dial has six positions. Here’s what each one does.
OFF. The meter is powered down. The TF2 runs on a standard 9V battery included in the box. Battery life is reasonable for intermittent testing, but keep a spare on hand for longer sessions.
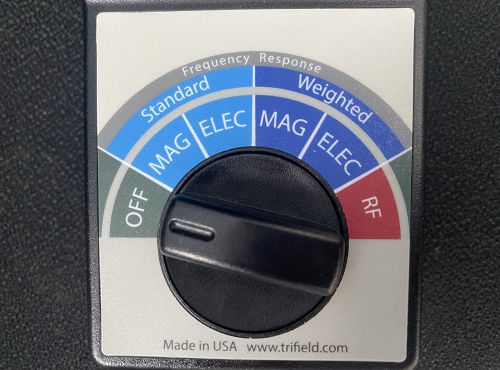
MAG (Standard). Measures magnetic fields in milligauss (mG). This is the mode you’ll use most often and the right one for comparing readings to building biology benchmarks. The magnetic field sensor is 3-axis, meaning it takes simultaneous readings from three directions and gives you a combined result. You don’t need to rotate the meter to find the peak. Just hold it steady.
ELEC (Standard). Measures electric fields in volts per meter (V/m). Single-axis, so hold the meter with the front face pointed toward the source you’re measuring.
MAG (Weighted). Also measures magnetic fields but applies a frequency filter that emphasizes certain parts of the spectrum. Produces higher readings than standard mode on the same source. Do not use this mode when comparing to precautionary benchmarks. If you want to understand exactly what weighted mode is measuring and when it changes anything about how you interpret a reading, I get into all of it in Trifield TF2 standard vs. weighted mode.
ELEC (Weighted). Same as standard electric field mode but with the frequency weighting filter applied. Same advice: use standard for benchmark comparisons.
RF. Measures radio frequency radiation in milliwatts per square meter (mW/m²). Covers 20 MHz to 6 GHz, which includes Wi-Fi, Bluetooth, cell signals, and most residential 5G frequencies. Single-axis, so point the front of the meter toward the source.
Understanding the Display
Before you take a single reading, there are two things on the display you need to understand.
The main number updates in real time. For magnetic fields this is fast and stable. For RF it can jump around significantly because wireless signals pulse rather than transmit continuously. A Wi-Fi router between pulses can look almost silent on the live display even when the peak output is well above the precautionary benchmarks.
The peak hold number sits in the upper left corner of the display. This is the highest reading the meter has captured since you started measuring in the current mode. For RF testing this is the number that actually matters. Reset it each time you move to a new location by switching the dial off and back on.
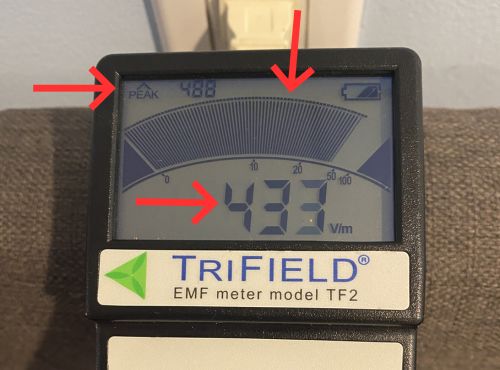
The bar graph display gives you a visual sense of relative strength alongside the digital number. It’s useful for sweeping through a room quickly because movement in the needle is easier to catch in your peripheral vision than changes in the digital readout.
The audible alert tones increase in frequency as field strength increases. When you’re walking slowly through a room looking for sources, you can follow the sound without keeping your eyes on the display the whole time.
How to Take a Reading That Actually Means Something
A single spot check near a random appliance doesn’t tell you much. The readings that matter are the ones taken in the places where you spend the most time, at body height, under conditions that reflect your normal day.
Hold the meter at roughly the height of your body in that space. In a bedroom that means pillow height when measuring near the bed. In a living room it means seated height.
Move slowly. Magnetic and electric fields can change dramatically over just a few inches near a source. RF fluctuates with signal activity. Give the meter a few seconds to settle before you record the reading.
For each location, note both the live reading and the peak hold. Write them down or photograph the display. You want a record you can compare against after you make any changes.
Always use standard mode for magnetic and electric fields when comparing to the Building Biology Evaluation Guidelines. Those benchmarks were developed using standard unweighted measurements.
Measuring Magnetic Fields
Turn the dial to MAG standard. Walk through your home slowly, starting in the areas where you spend the most time.
In most open areas away from appliances and wiring, you’ll see readings between 0.1 and 0.5 mG. That’s a typical background range for a normal home. Higher readings in the middle of a room often point to a wiring run in the wall or floor nearby.
Move toward appliances and watch what happens. Right up against my stove with the TF2 I measured over 80 mG. A foot or two back it dropped to 0.0 mG.
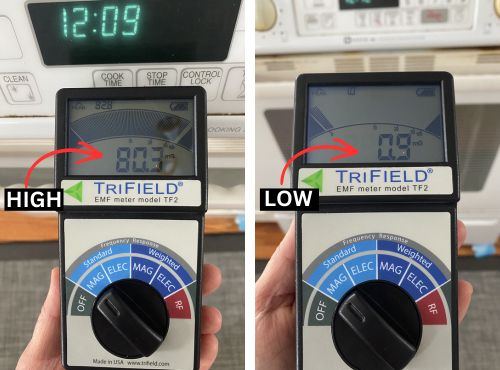
The stove is a good illustration of why context matters. A reading like that sounds alarming until you understand how quickly it falls off with distance. Nobody presses against the stove for hours, so it’s not a priority concern.
That said, it’s a reasonable habit to stand a comfortable step back while cooking rather than right up against it, especially when burners are running and the field is at its strongest. It costs nothing and it’s consistent with how building biologists think about routine, low-level exposure reduction.
The bedroom is where magnetic field testing matters most. Measure at pillow height on both sides of the bed, behind the headboard if there’s wiring in that wall, and near anything plugged in within a few feet of where you sleep. The precautionary benchmark for sleeping areas is below 1 mG. Note where you’re above that and trace it back to the likely source.
The electrical panel is worth checking too. Measure at the panel itself and then step back in one-foot increments to see how quickly the field drops. At my own panel I measured 42.3 mG with a peak of 44.2 almost touching the panel. About a foot back it was down to 3.4 mG, and at two feet it dropped to 1.3 mG. That’s still above the 1 mG precautionary benchmark for sleeping areas, but the panel is rarely somewhere you spend extended time. The point is to know where your panel is relative to the places you do spend time, like a bed on the other side of a shared wall.

Precautionary benchmarks for magnetic fields, based on the Building Biology Evaluation Guidelines:
- Below 1 mG: low, acceptable in sleeping areas
- 1 to 4 mG: moderate, worth investigating the source
- Above 4 mG: elevated, worth taking action where possible
Measuring Electric Fields
Turn the dial to ELEC standard. Hold the meter with the front face pointed toward what you’re measuring since this mode is single-axis.
Electric fields are produced by voltage in wires even when no current is flowing. A lamp plugged in but switched off still produces an electric field. This makes the bedroom the most important room to measure, because you may be within a few feet of in-wall wiring for eight hours every night without any of it being switched on.
Start at the bed. Measure at pillow height along both sides and behind the headboard. If there’s an outlet on the wall above or beside the headboard, measure close to it and then step back at one foot and two feet to see how quickly it drops.
In my bedroom, measuring practically at the outlet above my headboard with a lamp plugged in, I got 508 V/m with a peak of 538. About a foot back it was 22 V/m. At two feet it dropped to 6 V/m with a peak of 7, comfortably in the low range.

That two-foot difference took the reading from well above the precautionary threshold to well below it at no cost. If you find elevated readings near your headboard, the options are simple: unplug the lamp before bed, push the bed frame a few inches further from the wall, or switch off that circuit at the breaker at night.
Check power strips and extension cords near sleeping and sitting areas too. These are common sources of elevated electric field readings that are easy to overlook and often just as easy to move.
Precautionary benchmarks for electric fields, based on the Building Biology Evaluation Guidelines:
- Below 10 V/m: low, acceptable in sleeping areas
- 10 to 50 V/m: moderate, worth considering changes
- Above 50 V/m: elevated, building biologists typically recommend action
Measuring RF Radiation
Turn the dial to RF. This is the mode where understanding the display matters most, so read this section carefully before you start.
Because wireless signals pulse rather than transmit continuously, the live display window can look misleadingly low between pulses. A router can show almost nothing on the live display in the gap between transmissions, then spike sharply the moment it sends a signal. Watch the peak hold reading in the upper left corner of the display, not the live number. That’s what tells you what the meter actually captured. Reset the peak each time you move to a new spot.
The TF2 displays RF in mW/m². Most building biology benchmarks are written in µW/m². To convert, multiply the TF2 reading by 1,000. A TF2 reading of 0.100 mW/m² equals 100 µW/m².
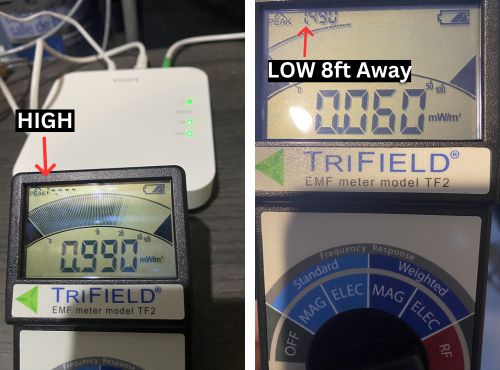
Start near your Wi-Fi router. Point the front of the meter toward it and note the peak hold reading, not the live window. Then step back in measured increments and watch the peak reading. RF drops off quickly with distance, which is why router placement matters so much.
When I tested my old conventional router, standing close the meter was peaking out completely, exceeding the TF2’s maximum RF range of 1.999 mW/m². At eight feet back the peak settled at 1.49 mW/m², which converts to 1,490 µW/m². That’s above the elevated threshold in the precautionary guidelines, and that was eight feet away. I eventually moved the router to the basement where we spend the least time, and readings throughout the main living areas dropped significantly.
After the router, test your phone. Place it on a surface and measure while it’s actively transmitting, then switch it to airplane mode and measure again. The difference is often striking and gives you a clear sense of what active wireless transmission actually looks like on the meter.
Precautionary benchmarks for RF, based on the Building Biology Evaluation Guidelines:
- Below 10 µW/m²: recommended for sleeping areas, especially for sensitive individuals
- Below 100 µW/m²: general precautionary benchmark for most people
- 100 to 1,000 µW/m²: elevated, worth reducing where possible
- Above 1,000 µW/m²: high, building biologists typically recommend action
Taking Before and After Readings
This is the part most guides skip, and it’s the part that actually tells you whether what you’re doing is working.
Before you make any change, note the reading in the affected spot. Write down the mode, the location, the distance from the source, and the date. After you make the change, return to the exact same spot, hold the meter at the same height and distance, and take the reading again.
If you move a router to a different room, measure the old location and the new one. If you switch off a circuit at the breaker before bed, measure the electric field at pillow height before and after. If you add distance between your bed and an outlet, measure at the new distance.
Before and after pairs are what turn a reading into useful information. A number on its own tells you where you are. A comparison tells you whether a change actually worked.
A Simple Order to Follow
If you’re not sure where to start, this is the sequence I’d use for a first pass through a home.
Start in the bedroom with MAG standard. This is where cumulative exposure is highest and where the benchmarks are most conservative. Measure at pillow height on both sides of the bed, behind the headboard, and near anything plugged in within a few feet of where you sleep.
Switch to ELEC standard and repeat the same spots. Pay particular attention to anything plugged into the wall near the bed, even if it’s switched off.
Move to wherever your Wi-Fi router lives and take RF readings at the router and stepping back in measured increments. Watch the peak hold reading, not the live display window. Note where the peak drops below 100 µW/m², which means below 0.100 mW/m² on the TF2 display.
Work through the rest of the house in MAG standard, checking near the electrical panel, the kitchen appliances, and any other spots where you or your family spend regular time.
Note anything consistently above the precautionary benchmarks and identify the most likely source. Most of the time the source is obvious once you start moving the meter around, and most of the fixes are free or close to it. Distance is almost always the first tool to reach for.
Frequently Asked Questions
Here are the questions that come up most often from people who are just getting started with the TF2.
How do I reset the peak hold reading?
Switch the dial to off and back to the mode you’re using. The peak clears and starts fresh. Get in the habit of doing this every time you move to a new location so you’re not carrying a peak reading from a previous spot into a new measurement.
Why does my RF reading jump around so much?
Because wireless signals pulse. Wi-Fi, cell signals, and Bluetooth all transmit in bursts rather than continuously. The live display catches whatever is happening at that exact moment, including the gaps between pulses. Watch the peak hold number. That’s the ceiling the meter actually captured during your measurement window.
My magnetic field reading changes depending on which way I hold the meter. Is that normal?
For magnetic fields, no. The TF2’s MAG mode is 3-axis, which means it combines readings from three directions simultaneously. The reading should be stable regardless of how you orient the meter. If you’re seeing significant variation, check that you’re in MAG standard or MAG weighted, not in ELEC mode, which is single-axis and does respond to orientation.
What’s the difference between standard and weighted mode?
Standard mode measures actual field strength across the frequency range and is what you use for home testing and benchmark comparisons. Weighted mode applies a filter that emphasizes certain frequencies and typically produces higher readings on the same source. Always use standard when comparing to building biology guidelines. The full explanation of what weighted mode is actually measuring is in the dedicated guide to Trifield TF2 standard vs. weighted mode.
The meter reads 0.0 mG in most rooms. Is something wrong with it?
No. That’s normal and actually good news. Background magnetic field levels away from appliances and wiring are often at or below the TF2’s minimum detectable level of 0.1 mG. A reading of 0.0 mG means the field in that spot is below what the meter can register, which is well within the precautionary benchmarks.
Should I measure with devices switched on or off?
For magnetic fields, switched-on appliances produce stronger fields than switched-off ones, so measure under normal operating conditions for the most realistic picture. For electric fields, plugged-in devices produce a field whether they’re switched on or not, so the state of the switch matters less than whether the device is plugged in. Measure with things in their typical state.
Good Readings Start With Good Habits
The TF2 is straightforward once you understand the display and know which mode to use where. Standard mode for magnetic and electric fields, peak hold for RF, body height in the places where you actually spend time, and before and after pairs whenever you make a change.
